

Teeth Whitening Before a Wedding: A Chicago Cosmetic Dentist's 8-Week Plan
You have the dress (or the suit). The venue is locked. The save-the-dates went out months ago.
And somewhere on your list — usually pinned to a Sunday-night spiral around month four of planning — is the question: what about my teeth?
I get this conversation in my Lakeview studio constantly between January and September. Sometimes it's the bride. Often it's the groom. Increasingly, it's the mother of the bride, the maid of honor, the person giving the toast. They all want the same thing: a smile that looks rested, radiant, and natural in every single one of the thousands of photos they're about to be in for the rest of their lives.
The honest truth is that beautiful wedding-day whitening doesn't happen in a panic the week before. It happens on a plan. Here's the eight-week version I walk my patients through.
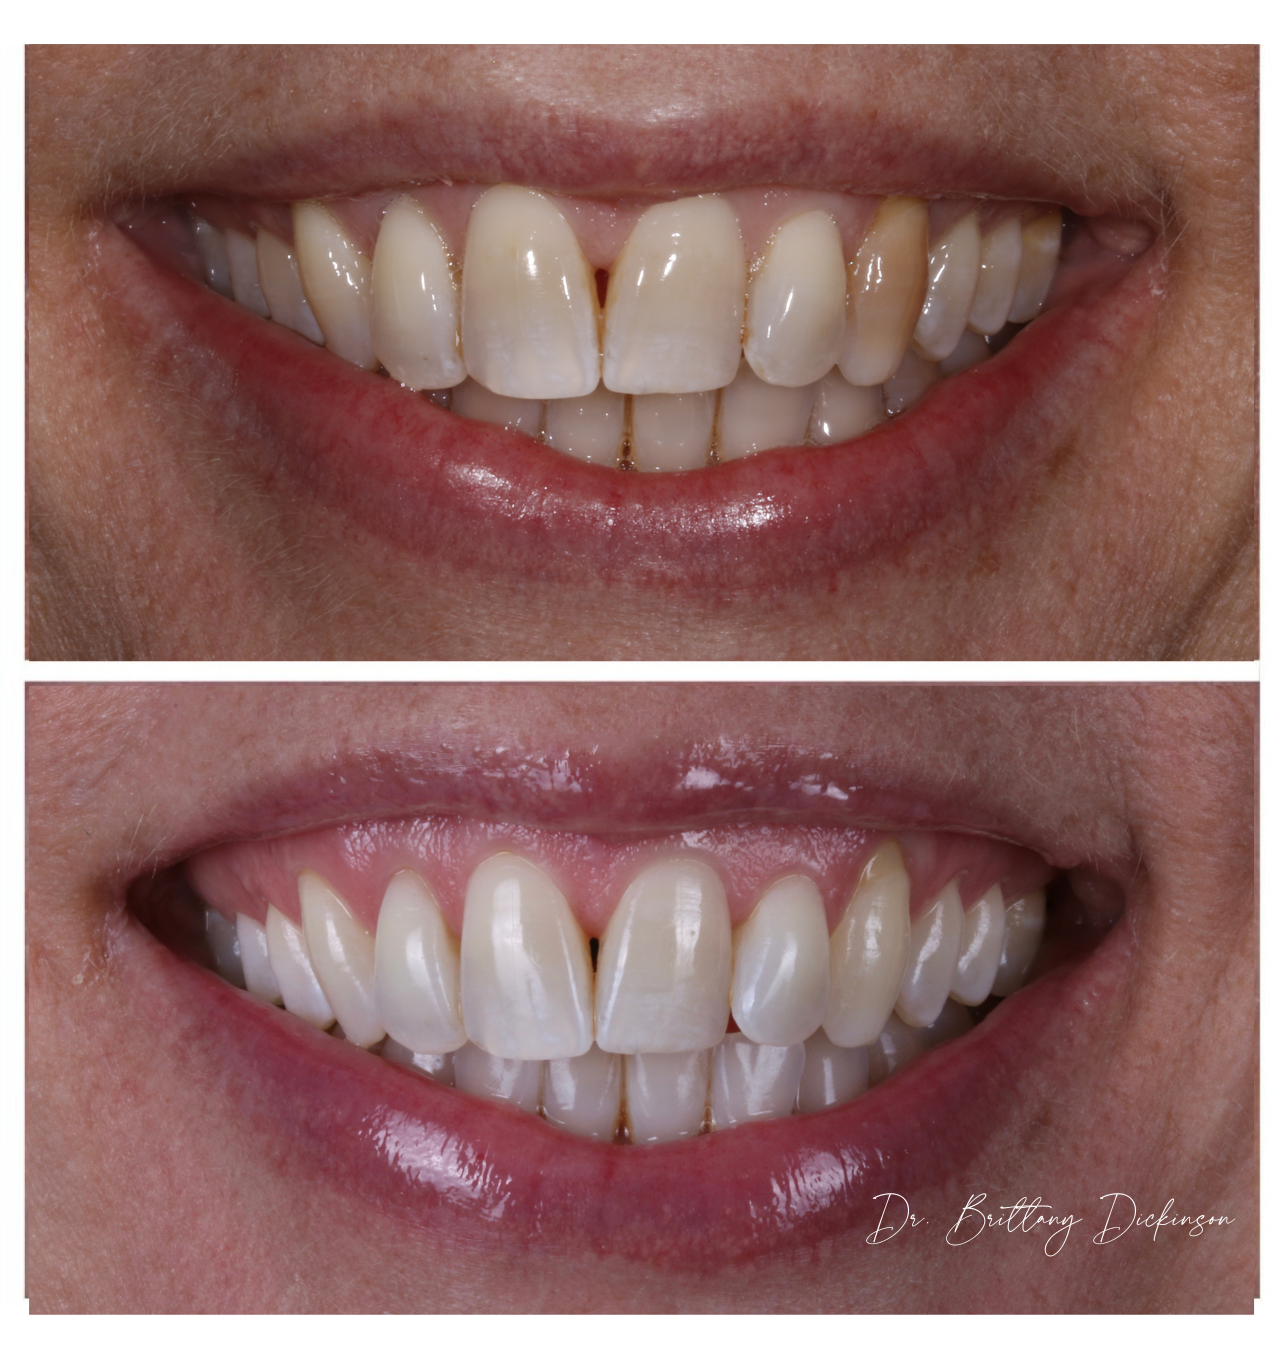
Why Professional Teeth Whitening Before a Wedding Matters More Than You Think
You will look at your wedding photos for the next forty years. Your kids will look at them. Your grandkids will look at them. And in every single one, your smile will be the first thing the eye lands on.
That's not pressure — it's permission. Permission to do this thoughtfully, the way you'd plan any other detail you want to feel proud of decades from now.
The reason professional whitening matters here, specifically, isn't just brightness. It's predictability. Drugstore strips and grocery-store gels are designed for a generic mouth. Your mouth has a history — old composite fillings that won't change color, a crown on a front tooth, a small chip you've forgotten about, maybe some sensitivity from years of cold-brew. A professional plan accounts for all of it before we ever apply gel. That's what keeps the result looking even and natural in candlelight instead of patchy or chalky under flash.
The 8-Week Wedding Whitening Plan
This timeline isn't rigid — patients with sensitivity or significant dental history may need a longer runway, and patients with already-bright enamel can sometimes compress it. But the structure is what creates the result.
Weeks 8–7 Out: Consultation, Cleaning, and a Sensitivity Map
The first visit is the most important one, and it's the one most patients skip when they go the DIY route. We do a full assessment of your current shade, your enamel, any existing dental work, and — critically — your sensitivity history. Some patients can whiten aggressively with zero discomfort; others need a slow, gentler approach with desensitizing protocols built in. There's no way to know which one you are without an exam. Have sensitive teeth? I have a separate sensitive-teeth protocol page — see Whitening for Sensitive Teeth→
This is also when we get a professional cleaning on the books. Whitening gel works dramatically better on a clean tooth surface. Skip this step and you're whitening over plaque and surface stain, which gives you a less even, less long-lasting result.
Finally, we choose the target shade. Not the brightest shade on the guide — the shade that's right for your face, your skin undertone, and the photos you'll actually be in. This is the conversation that quietly separates a beautiful wedding-day smile from one that reads "I got my teeth done" in every reception picture.
Weeks 6–5 Out: In-Office Session
This is the day we do the heavy lifting. In my practice, I use a professional-grade in-office system that lifts shade significantly in a single appointment — typically the result that would take a drugstore product six to eight weeks of nightly use to even approximate. The session itself runs about 90 minutes, and most patients spend it with headphones on, doing emails on their phone, or honestly, taking a nap.
We isolate your gums carefully (this is the part DIY can't replicate — exposed-gum whitening is what causes those stinging horror stories), apply gel in controlled cycles, and monitor your sensitivity in real time. If something starts to feel uncomfortable, we modify mid-session. That control is the entire reason the result looks even when we're done.
Weeks 4–3 Out: Custom Take-Home Tray Fitting
After the in-office session, I send most wedding patients home with custom-fit trays — molded to your teeth specifically, not the floppy one-size-fits-most boil-and-bite version. The gel concentration is lower than the in-office system but high enough to do real work, and you'll wear the trays for short sessions (typically 30 minutes a day for two weeks, though I tailor it case by case).
For those who have trouble carving out time for the trays, I have a touch up pen for on-the-go whitening. It’s slightly less effective than the trays. But I always say, the most effective system is the one you’ll actually use.
This is the "fine-tuning" phase. The in-office session does the dramatic lift; the trays or pen even out the result, deepen it slightly, and let us land precisely on the shade we discussed at consultation. Patients with deeper or more uneven starting shades sometimes need a longer tray phase — which is exactly why we don't start this conversation at week three.

Weeks 2–1 Out: Settle and Stabilize
You're going to stop active whitening here. That's intentional.
Freshly whitened teeth are slightly more porous in the first few days after a session — meaning they're also more vulnerable to absorbing color from coffee, red wine, berries, beets, anything dark. By giving your enamel a one-to-two-week rest before the wedding, the color stabilizes, the pores re-mineralize, and the shade you see on the wedding day is the shade you'll see for months after.
This is also when we'd do a final touch-up if anything looks uneven, and when we'd add a quick desensitizing treatment if you've had any sensitivity through the process.
Wedding Week: A Light Touch-Up (Optional)
For some patients — usually the ones with the most dramatic shade change — I'll do a final single-session light touch-up 48 to 72 hours before the ceremony. For most, the result is already locked in and we leave it alone. Either way, you walk into your wedding week confident.
What If Your Wedding Is Sooner Than 8 Weeks Out?
I get this question constantly. Honest answer: we can work with as little as two to three weeks if we have to, and the result will still be beautiful — just less dramatic than a full eight-week plan, and with less buffer for sensitivity if it arises.
What I will not do is rush a patient with significant sensitivity or extensive front-tooth dental work into an aggressive timeline. That's how people end up with uneven results in photos. If your timeline is tight, we'll plan something appropriate for the runway we have — not jam the standard plan into half the time.
If your wedding is more than three months out, even better. We have room to combine whitening with other small refinements (a hygiene reset, a small bonding repair, a take-home maintenance phase) so your entire smile is doing its best work on the day.
What About Sensitivity? (The Question Everyone Asks)
Real answer: sensitivity is the number-one fear patients bring into the whitening conversation, and it's the number-one reason patients have had bad experiences with drugstore products in the past.
In my studio, we manage sensitivity actively — not just by hoping for the best. That looks like a desensitizing pre-treatment for patients with a history of cold sensitivity, modified gel concentrations for sensitive enamel, shorter and more frequent tray sessions instead of long aggressive ones, and a take-home protocol that includes a fluoride or potassium-nitrate rinse if needed.
I had a bride last spring tell me, before her first session, that she'd had to abandon a drugstore kit halfway through because the sensitivity was so painful she couldn't drink water. We modified her in-office protocol, paced her trays differently, and she finished the eight-week plan with zero sensitivity and a result she still talks about. The product mattered less than the plan.
A Real Patient Story
One of my favorite recent cases was a patient — I'll call her L. — coming in roughly five months before her June wedding. She had a single old composite filling on a front tooth that wouldn't whiten with anything (composite doesn't change color the way enamel does), some mild sensitivity history, and a starting shade that was honestly fine for everyday life but would have read dull in photos.
We did the eight-week plan, and then quietly replaced the composite filling at week six to match the new whiter shade — a 45-minute appointment that nobody else would have noticed but that meant her wedding photos had no visible color difference across her front teeth.
She sent me a photo of her toast a month later. It's framed in my studio.
That's the work I love most: the version of you that looks like you, on your most photographed day, with every detail quietly accounted for.
Ready to Map Your Wedding Smile?
If your wedding (or your engagement shoot, or your gala, or your milestone birthday) is on the calendar, the best thing you can do today is start the conversation. Eight weeks is the ideal runway, but a consultation now gives us room to plan whatever timeline you have.
Booking a Smile Design Consultation is the first step — we'll look at your starting shade, any restorations, your sensitivity history, and your photo timeline, and build a plan that lands you exactly where you want to be on the day.
**Book a Smile Design Consultation →**
Chicago Aesthetic Dentistry — Dr. Brittany Dickinson, DMD — 3346 N. Paulina St., Lakeview, Chicago.